

Set Up KWANi Email Automations In Five Easy Steps
One excellent way to increase sales in your store is to encourage people who purchased from you in the past to come back and buy again! You do this by sending an email - called a Replenish Email - that includes the product they previously purchased and a call to action to buy that product from you again. You can make the offer more tempting by offering a discount on their next purchase.
Sending replenish emails does two very important things for your store.
- It gives you the opportunity to build customer loyalty by offering them what they need right when they need it.
- It grows your customer's lifetime value, which has been shown to increase average order value as well.
KWANi has an Email Automations feature that enables you to individualize the replenish emails you send from your store. And, the best part? It's easy to set up and activate. No more customer segmentations, flow automations, or excel calculations.
Ready? Let's set up your replenish emails in five easy steps:
- Subscribe to KWANi
- Set up your DNS
- Set up your branding
- Add a discount
- Activate emails
Need some guidance on how to set things up? We've got you covered. Simply email us at support@kwani.app or click HERE to set up time with our tech guru, John.
Step 1 - Subscribe to KWANi
Go to the Shopify app store and locate the "KWANi" app listing page. You can also click HERE to access the listing page. Click the black "Install" button to install KWANi in your store.

Once you install the app, you will be brought to the Welcome Screen. Click on the Subscription title in the lower left navigation menu to go to the Subscription page. Once on the subscription page, you will see a description of the monthly usage fee. KWANi charges $0.20 per customer per month to send dynamically created individualized communications for re-ordering from your store.
Click on the "Activate" button.

The next step is to approve the KWANi subscription plan in your store. You will automatically receive a 30-day free trial of the KWANi custom communications system. Click the "Approve" button.

Once approved you should end up back on KWANi’s Subscription page. If you are not automatically rerouted back to the Subscription page, click on the KWANi logo to go back to the home page. You will see under Step 1 that Subscribe now has a green checkbox next to it.
Now it's time to set up your replenish emails in the Email Automations menu.
Step 2 - Set up your DNS
Click on the Email Automations menu in the lower left navigation menu of PetPro AI. This will take you to the Email Automations setup page at KWANi.
Click on Email DNS Setup as shown in the image below. You will see rows of text boxes to fill in with your DNS information. To the right is a mock email that will populate as you fill in the text boxes.

Enter your site's root domain (mystore.com) in the Domain text box.

Next, think of a simple short unique term for your email subdomain. This will be a new term and could be "mail", "email", "e", etc. Once you think of one, enter it in the From subdomain text box.

Like the From subdomain, think of a simple short unique term for your link tracking subdomain. This will be a new term and could be "c", "click", "link", etc. Once you think of one, enter it in the Link tracking subdomain text box.
The From name can be the name of your store, "My Pet Store". Enter the name you want to be visible in the From line of your emails.

The From email address must be a real email address, such as "support" or "Info", which appears before the @ of your store's name. Enter the first portion of the email address in the From email address text box.

The Reply-to email address can be the same real email address entered in the From email address or it can be a different email address. Enter the first portion of the email address in the Reply-to email address text box. You can also copy and paste the entry from the From email address text box.

Each entry to type into the text boxes will be show up in the email to the right so you can see what the email will look like.
Once the above values are entered into the text boxes, click the 1. Save Settings button. Within a minute, a notice will appear with the DNS records you will need to add to to your domain name server. Instructions below are for GoDaddy.com DNS server setup.

Set up DNS in GoDaddy
There are several places you can host your DNS servers for your website. GoDaddy is the most commonly used, so we are including it in this article.
Add First CNAME Record
- Sign in to your GoDaddy Domain Portfolio.
- Select Domain Edit Options next to your domain and then select Edit DNS. You may need to scroll down to see Edit DNS.

3. Select Add New Record.

5. Enter the details for your new CNAME record:
- Name: [Host/Alias value from PetPro AI, Notifications, Email DNS Setup, Show DNS Records. see screen below]
- Value: [Value value from PetPro AI, Notifications, Email DNS Setup, Show DNS Records]
- TTL: Set to shortest time possible
6. Select Save to add your new record.

Add Second CNAME Record
- Sign in to your GoDaddy Domain Portfolio.
- Select Domain Edit Options next to your domain and then select Edit DNS. You may need to scroll down to see Edit DNS.
3. Select Add New Record.
4. Select CNAME from the Type menu.
5. Enter the details for your new CNAME record:
- Name: [Host/Alias value from PetPro AI, Notifications, Email DNS Setup, Show DNS Records. see screen below]
- Value: [Value value from PetPro AI, Notifications, Email DNS Setup, Show DNS Records]
- TTL: Set to shortest time possible
6. Select Save to add your new record.
Add a TXT Record
- Sign in to your GoDaddy Domain Portfolio.
- Select Domain Edit Options next to your domain and then select Edit DNS. You may need to scroll down to see Edit DNS.
3. Select Add New Record.
4. Select CNAME from the Type menu.
5. Enter the details for your new CNAME record:
- Name: [Host/Alias value from PetPro AI, Notifications, Email DNS Setup, Show DNS Records. see screen below]
- Value: [Value value from PetPro AI, Notifications, Email DNS Setup, Show DNS Records]
- TTL: Set to shortest time possible
6. Select Save to add your new record.
When your DNS is fully verified, your Email Automations page should look like the image below.

You can easily edit your DNS settings from this same screen by simply clicking the green "edit" button and entering new information. You will have to go through the DNS records verification process again.
Step 3 - Set up your email template branding
Now that your DNS is verified, it's time to add your logo and brand colors to the replenish email template that will be sent to your customers.
You will need to have a jpg or png version of your logo on your computer so you can upload it to KWANi. Your logo will appear at the top of the replenish email.
Click the Select Logo button and upload your logo file. Your logo will now appear on the email mock up on the right. You can size the logo by simply sliding the "logo size" bar left or right. The logo size will change in real time in the email template on the right.
Use the color chart at the bottom to add your specific brand color to the "Add to Cart" button on the replenish email template.
Be sure to click "Save Settings" when you are satisfied with logo size and brand color on the template.

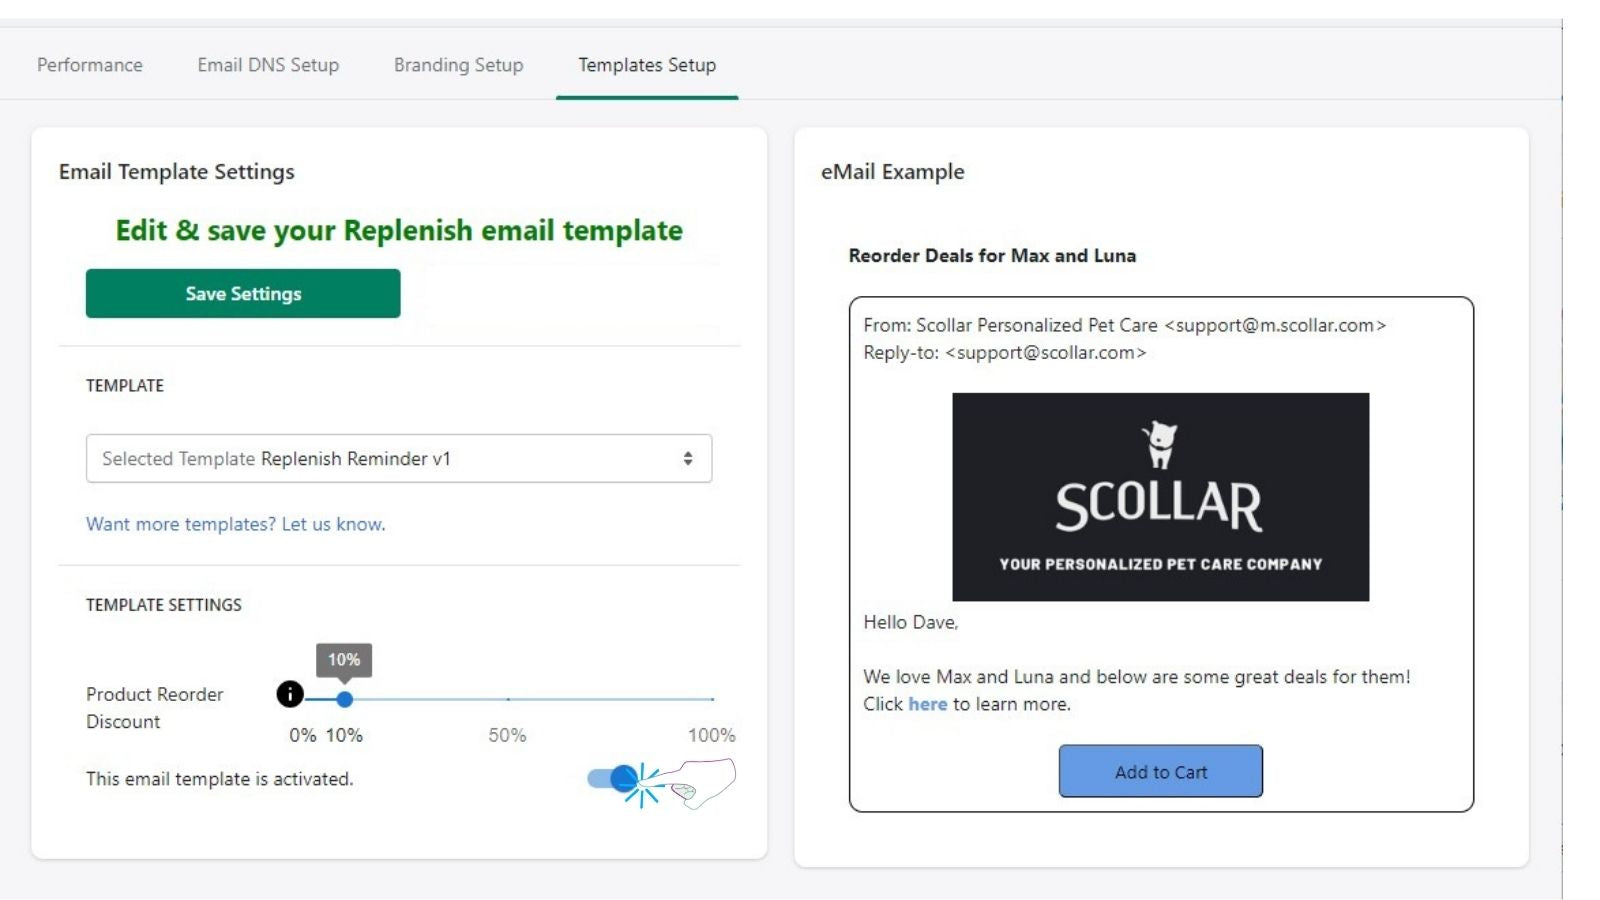
Step 4 - Add a discount
One excellent way to entice customers back to your store is to give them a loyalty discount. Click on the Template Setup tab to add a discount to the replenish email. You can change the discount % by simply sliding the "logo size" bar left or right.
The discount code can only be used one time by the customer and will only work within six days of being created. This discount code is included in the replenish email and will show up on the list of discount codes in your Shopify Admin account.

Step 5 - Activate replenish emails
Once you set up the branding and discounts on your replenish email template, be sure to activate the replenish email! Simply slide the "This email template is activated" toggle to the right until it turns blue. KWANi will automatically populate and send replenish emails to your customers every two weeks.
That's it! Now you are ready to encourage your current customers to repurchase in your store.
Drop us a line and let us know if you have any questions about setting up Email Automations in your e-commerce store. We are happy to assist you with installation and onboarding of KWANi. You can email us at support@kwani.app or click HERE to set up time with our tech guru, John.